Berthing basics: how to tie up a boat
Learning how to tie up a boat is essential for safe, happy boating.
Being safe at the helm out on the water is the most basic boating skill, but the ability to berth a boat properly and securely tie it to the shore or pontoon is also essential knowledge for happy boating. Yet it’s something that’s frequently done very poorly—and even by boaters with lots of experience.
While it may not seem like a big deal, there are plenty of instances where a poorly secured boat causes significant damage to itself and nearby boats. So, whether you’ve got a gin palace or an inflatable dinghy, knowing how to secure your boat properly can certainly prevent a lot of expensive headaches.
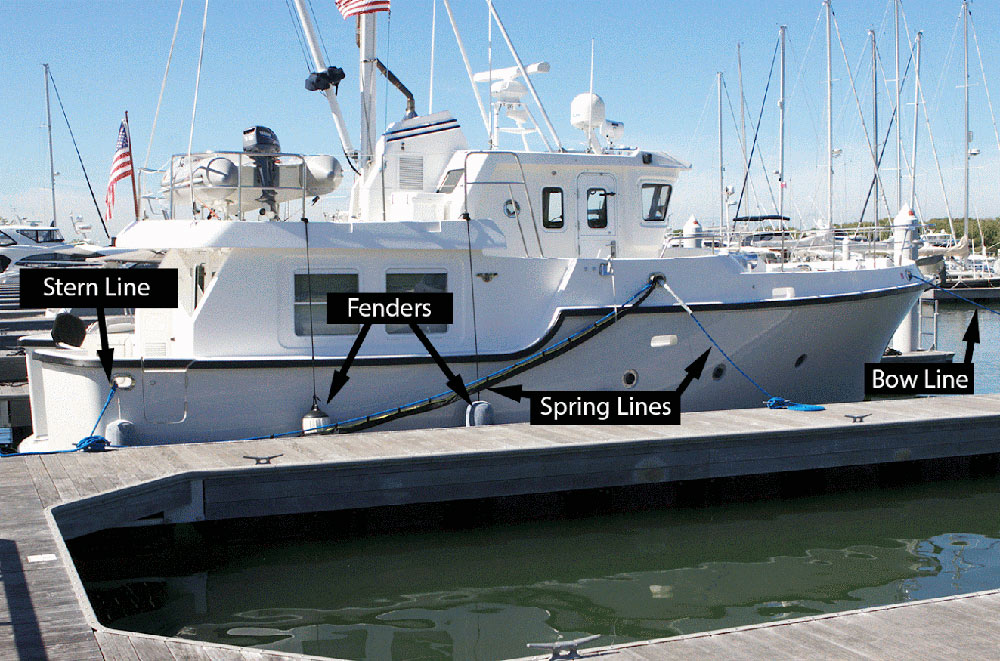
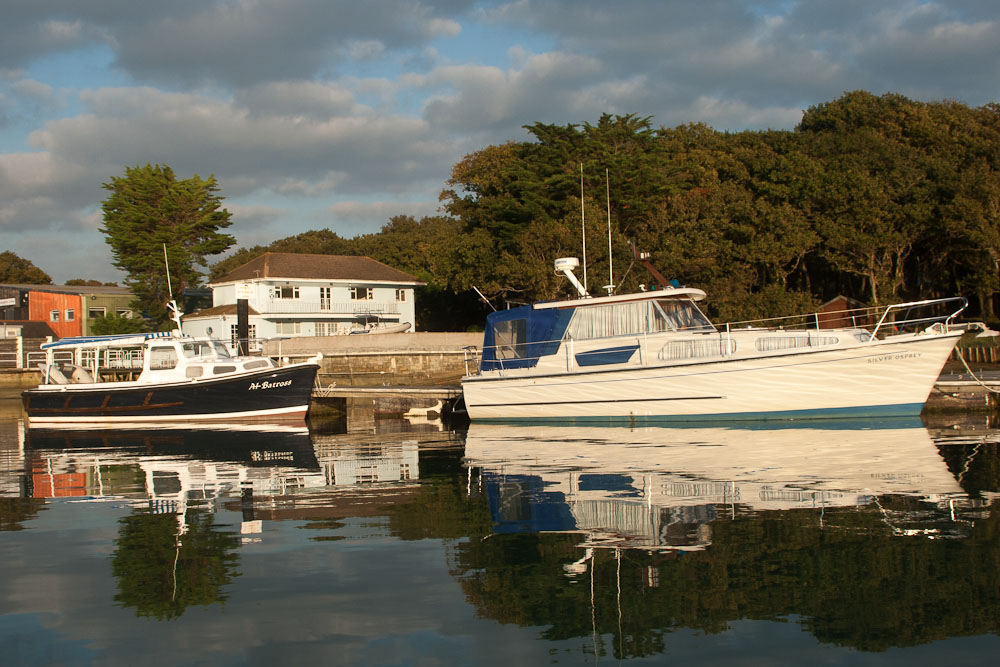
Tied with a stern, bow, and spring lines, with plenty of fenders - this boat is well secured to the dock. | Image from boats.com
As with most nautical activities, it’s worth starting with a look at some basic vocabulary to define the main concepts.
You may also want to check out our guide to everyday boating terminology and boat words if you’re not familiar with concepts such as bow (the front of the boat), stern (the back of the boat), or port and starboard (left and right, respectively).
Jump to:
- Lines
- Mooring gear
- Cleats, pilings, and rings
- Tying up in a slip or berth
- Tying up alongside
- Related reading
Lines
Contrary to popular belief, there is such a thing as ‘rope’ on a boat. However, as soon as you give the rope a job, it becomes a specific type of line. When it comes to mooring, the main lines you’ll need to know are as follows:
Bow Lines: Bow lines stop the bow of a boat from moving side to side. A bow line also keeps a boat from drifting away when tied alongside, such as when you’re tied off to a bulkhead or pier.
Breast Lines: Breast lines are used to keep a boat from moving away from a pier or to make it easier to pull the boat closer for easier boarding.
Spring Lines: Spring lines keep a boat from moving forward or aft. Generally, only two of these lines are required, but as many as four are sometimes used in situations such as strong weather conditions or if your lines are undersized for your vessel.
Stern Lines: Stern lines prevent the stern of a boat from moving side to side. When tying up alongside a bulkhead or pier, a stern line also keeps a boat from drifting away from the dock.

Contrary to popular believe, there ARE ropes on a boat. However, as soon as they're given a job, they become "lines". Knowing your lines is an essential part of boat handling. | Photo by Jonathan Hooper on Unsplash
Other mooring gear
Fenders: Fenders can be anything from a flat piece of foam to a large inflatable rubber buoy. They’re designed to cushion your boat when you’re tied up alongside a pier or bulkhead or in any other instance when there’s no way to prevent your vessel from making contact with a dock, piling, pier, or another boat. Avoid the urge to call these “bumpers” at all costs; this will mark you as a boating newbie.
Cleats: A cleat is a horn- or T-shaped piece of hardware on a boat or dock that you can tie your lines to.
Pilings: A piling is a long piece of timber or metal that’s driven into the ground or seabed. Some pilings stand independently, while others have structures such as bulkheads, docks, or piers attached to them. When a cleat is not present, a piling can be used to secure a dock line.
Mooring rings: Mooring rings are more common when tying up to harbour walls than anywhere else, but you may also find them in locks. As the name suggests, these are usually metal rings attached to chains. Generally, a boater will loop a line through a mooring ring and secure both ends on their own vessel, making it easy to slip the lines when ready to depart.
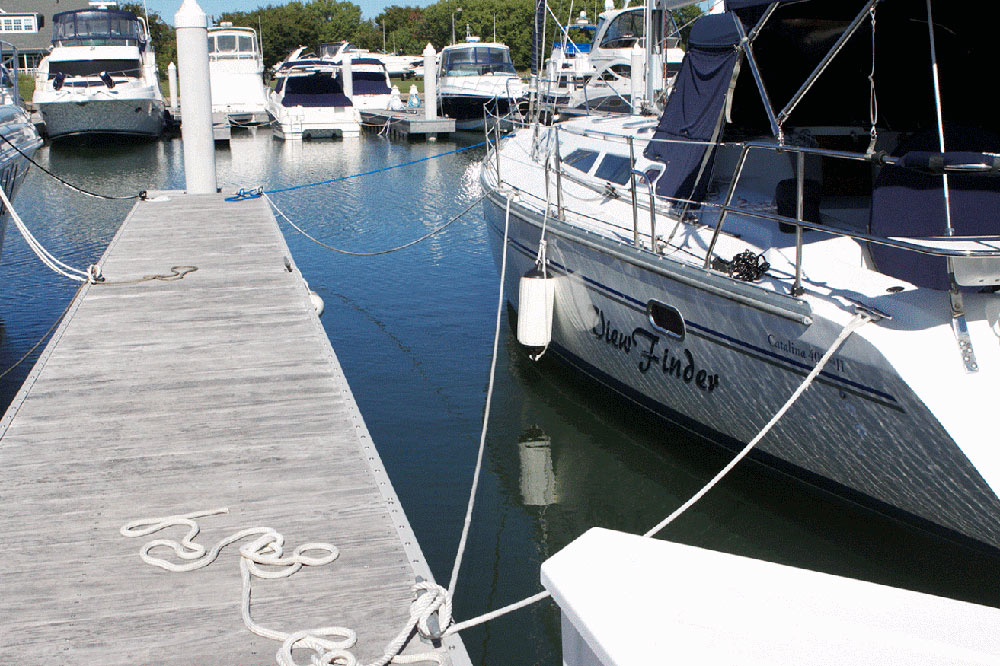
With its bow line, forward and aft spring, and stern line all attached to cleats, this is a decent example of a good mooring job. However, the loose ends could benefit from being neatly coiled to get full marks! | Image from boats.com
When you pull into a slip or alongside a pontoon or harbour wall, you’ll usually encounter three things to tie your boat to: cleats, pilings, or mooring rings. Some places will have a combination of these, while some have only one or the other. Knowing how to secure a line to a cleat, ring, or piling is vital to tying up your boat safely and securely, so let’s have a look at how it's done.
Cleats and pilings
Tying off to a cleat—either on your boat or the dock—is easy. The best way to learn it is to watch our video on tying a line to a cleat. If your dock lines have pre-spliced loops in them, you can weave the loop through the centre of the cleat (the eye) and then drape it back over both cleat horns before pulling it tight. Otherwise, wrap your line around the cleat in a figure of eight, making sure to secure it at the end.
Tying off to a piling can be more challenging. If you’re on a short-term mooring and have long enough lines, it may be easiest to wrap your line around the piling and bring it back to the boat to tie it off to your own cleats.
Alternatively, a clove hitch is an excellent knot for tying off to a piling, or you could use a loop in the end of a line (either by tying a bowline knot or by using a line with a pre-spliced loop) and drape this over the piling. If you’re not sure how to tie a clove hitch or bowline, check out the videos below, as well as our article on boating knots.
If you’re faced with a mooring ring, it may help to realise that these can be tied very similarly to pilings. The first (and easiest) way to tie off would be to simply loop a long line through the ring, securing both ends to your vessel’s cleats. This makes slipping the lines for departure quick and easy, and is ideal when tying up in a lock or other temporary location.
If your lines aren’t long enough to get to a mooring ring and come back to the boat, a bowline, round turn and two half-hitches, or a similar knot should work to secure your vessel.

You’ll often use pilings for attaching your mooring lines. This boater has attached his in an unconventional manner, since this is the boat’s home slip and the lines never come off the pilings. | Image from boats.com
Tying up a boat in a slip or berth
The terms “slip” or “berth” are often used interchangeably, depending on where you do your boating. Either way, a slip or berth is a defined area between two piers, two sets of pilings, or a combination of the two.
The idea when tying up in a slip is to keep the boat far enough away from the dock, pilings, and other boats to avoid hitting them, but not so far as to make boarding difficult. You’ll want fenders and lines set up on both sides when approaching a slip so you’re well protected.
You’ll usually need six total lines: four for your bow and stern (two each) and two spring lines. The spring lines should be about one and a half times the length of your boat, while the bow and stern lines can be at or just under the length of your boat.
Using the techniques we discussed above to secure your lines, tie off a line to each bow cleat to keep the boat from moving side to side. Remember that sometimes you will need to crisscross them to get the correct angle. Repeat the process with your two stern lines. Make sure your lines aren’t hitting any hard chafe points and aren’t tangled in any way. Neatly coil excess line on the deck to avoid creating tripping hazards on the walkways.
Spring lines are a bit trickier. Just remember, we’re trying to keep your boat from moving fore and aft.
First, set up your forward spring line to stop you from moving forward. Secure a spring line to a cleat or piling ashore near your boat’s stern. Next, run it forward to either a midship cleat or all the way to a bow cleat (depending on what you have available). This forward spring line will prevent your boat from moving ahead in the slip.
Next, do the same in reverse to create a stern spring to stop you from moving backwards. Secure another spring line from a cleat or piling that’s at or forward of the bow, back to the aforementioned midship cleat or all the way aft to a stern cleat. This line will keep your boat from moving backwards in its slip. You can run the fore and aft springs on opposite sides if necessary.
Lastly, be sure you leave enough slack in all of your dock lines to account for the rise and fall of the tide in your area. Spring lines should remain fairly taught, however, and can generally adjust with the tide, especially if they’re nice, long lines. And don’t forget to place fenders anywhere your boat might make contact with the pontoon, wall, or other vessels.
Tying up alongside
Securing your boat alongside a pier, wall, or pontoon is another common scenario. Fenders are vital, as they provide cushioning and protection from the solid things you’ll be tying up to. Most folks tie their fenders off with a piece of line and hang them between the boat and the pier or bulkhead, usually from deck railings or lifelines using a clove hitch, though some boats have special cleats just for hanging fenders.
Tying up alongside is just like tying up in a slip or berth, but you’ll only be tying off on one side. Again, you’ll need to secure your forward and aft lines and two spring lines to prevent the boat from moving around too much while moored.
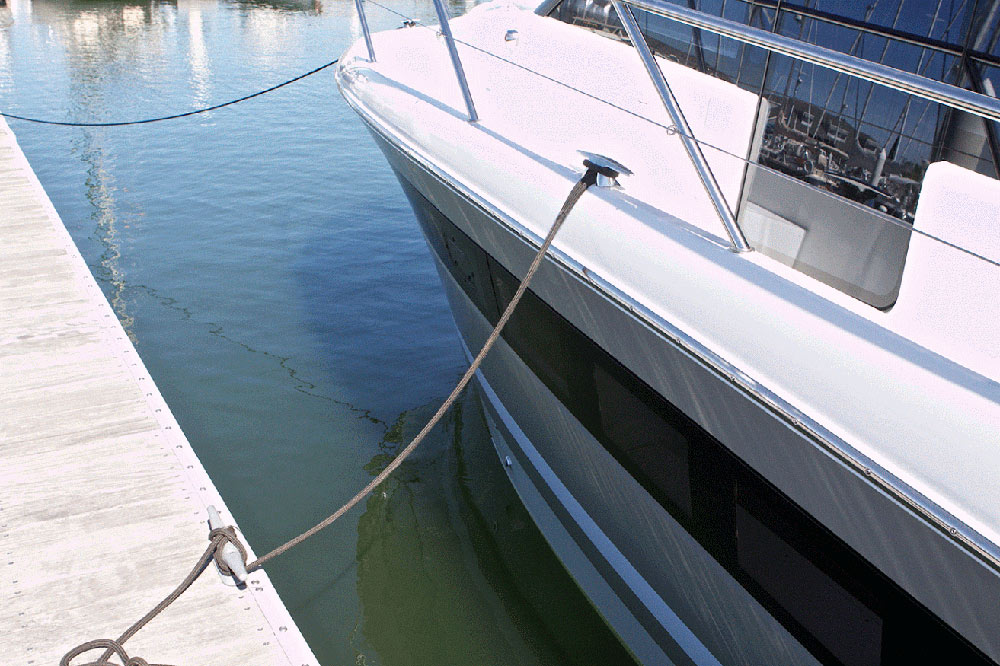
A breast line keeps this powerboat from drifting too far away from the dock and makes it easier to pull it in when boarding. | Image from boats.com
If you find your boat wandering out from the pier or bulkhead too far because of the angle of your bow or stern line, consider running a breast line perpendicular from the pontoon to a midship cleat. You can also run an individual breast line to the stern and the bow cleat.
One thing many boaters fail to do after they’ve secured all their dock lines is to test out how good a job they’ve done. You can see if you’ve done a proper job tying up by tugging on each dock line to make sure the boat doesn’t hit anything as it swings back and forth while also ensuring there’s enough slack to allow the boat some movement.
As with anything, practice makes perfect. The more docking situations you encounter, the better you’ll become at getting your boat tucked in properly.
Related Reading
For more tips and tricks to bring your boat into her berth like a pro, check out some of our other articles:
- How to berth safely: wind against tide
- The secret to fast and easy mooring
- Marina berthing: how to berth your boat perfectly
- Boat knots you need to know>
Editor's note: This article was originally written by Gary Reich in January 2021, most recently updated by Pippa Shaw in December 2025.